


Apple iPhone 6 Plus
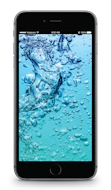 Excellent condition128 GBSpace GrayR6 999.00Sold forR4 659.00or on credit for R478.00 pmor on instant credit
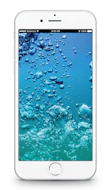
![Apple iPhone 6 Plus image]() Like New condition128 GBSilverR6 999.00Sold forR4 369.00or on credit for R448.00 pmor on instant credit
Like New condition128 GBSilverR6 999.00Sold forR4 369.00or on credit for R448.00 pmor on instant credit
'%3e%3c/path%3e%3cpath d='M15.472 50.985l2 2.002a.5.5 0 0 1 0 .707L4.479 66.688a.5.5 0 0 1-.707 0L1.77 64.687a.5.5 0 0 1 0-.707l12.995-12.995a.5.5 0 0 1 .707 0z' fill='white' stroke='%232F2B64' stroke-width='2'%3e%3c/path%3e%3ccircle cx='44.5' cy='68.5' r='2.5' fill='%232F2564'%3e%3c/circle%3e%3crect x='40' y='12' width='9' height='2' rx='1' fill='%232F2B64'%3e%3c/rect%3e%3cpath fill-rule='evenodd' clip-rule='evenodd' d='M63.5 26C70.404 26 76 20.404 76 13.5S70.404 1 63.5 1 51 6.596 51 13.5 56.596 26 63.5 26z' fill='%2315CCAF'%3e%3c/path%3e%3cpath fill-rule='evenodd' clip-rule='evenodd' d='M55.152 15.907a.49.49 0 0 1-.01-.7l1.969-1.995a.501.501 0 0 1 .705-.007l3.362 3.285a.504.504 0 0 0 .707-.005l7.237-7.336a.507.507 0 0 1 .708-.01l2.019 1.946c.198.19.201.505.01.7l-9.867 10.001c-.193.194-.438.271-.543.168l-.553-.53-5.744-5.517z' fill='white'%3e%3c/path%3e%3c/svg%3e)
'%3e%3cmask id='a' maskUnits='userSpaceOnUse' x='2' y='2' width='57' height='59'%3e%3cpath fill-rule='evenodd' clip-rule='evenodd' d='M22.148 5.926c-1.182 1.915-3.936 3.402-6.119 3.3-2.182-.101-4.126 1.674-4.318 3.942-.193 2.27-1.97 4.918-3.948 5.886-1.977.969-2.908 3.481-2.067 5.585.842 2.103.45 5.31-.871 7.126-1.32 1.815-1.024 4.49.657 5.946 1.682 1.454 2.763 4.483 2.403 6.73-.359 2.25 1.096 4.474 3.232 4.948 2.139.472 4.446 2.63 5.13 4.794.683 2.164 2.963 3.43 5.066 2.814 2.105-.618 5.109.175 6.678 1.76a4.076 4.076 0 0 0 5.74.035c1.586-1.567 4.599-2.32 6.696-1.676 2.095.644 4.39-.593 5.098-2.75.71-2.155 3.041-4.285 5.184-4.73 2.141-.447 3.62-2.655 3.289-4.907-.334-2.252.783-5.267 2.481-6.7 1.697-1.434 2.024-4.106.725-5.938-1.3-1.831-1.654-5.042-.79-7.134.865-2.092-.037-4.616-2.003-5.609-1.965-.993-3.711-3.664-3.877-5.935-.166-2.272-2.089-4.071-4.272-3.997-2.184.074-4.922-1.446-6.081-3.377-1.16-1.93-3.666-2.59-5.566-1.467-1.902 1.124-5 1.105-6.887-.043a3.953 3.953 0 0 0-2.056-.574 4.15 4.15 0 0 0-3.524 1.971z' fill='white' stroke='white' stroke-width='2'%3e%3c/path%3e%3c/mask%3e%3cg filter='url(%23filter1_i)' clip-rule='evenodd' mask='url(%23a)'%3e%3cpath fill-rule='evenodd' d='M-1.414 64.166h63.961V-.418h-63.96v64.585z' fill='white'%3e%3c/path%3e%3cpath d='M-1.414 64.166h63.961V-.418h-63.96v64.585z' stroke='%232F2564'%3e%3c/path%3e%3c/g%3e%3c/g%3e%3cmask id='b' maskUnits='userSpaceOnUse' x='28' y='34' width='6' height='5'%3e%3cpath fill-rule='evenodd' clip-rule='evenodd' d='M28.952 36.23c0 1.161.926 2.102 2.07 2.102 1.143 0 2.07-.94 2.07-2.102 0-1.16-.927-2.1-2.07-2.1-1.143 0-2.07.94-2.07 2.1z' fill='white'%3e%3c/path%3e%3c/mask%3e%3cg mask='url(%23b)'%3e%3cpath fill-rule='evenodd' clip-rule='evenodd' d='M24.846 42.498h12.352V29.963H24.846v12.535z' fill='white'%3e%3c/path%3e%3c/g%3e%3cpath d='M23.776 20.83v21.125h-4.89V24.753h-4.224v-3.924h9.114zM44.23 37.971v3.983H28.265v-3.169l8.148-7.696c.866-.824 1.45-1.529 1.75-2.112.303-.604.454-1.197.454-1.78 0-.846-.292-1.49-.876-1.932-.563-.463-1.398-.694-2.505-.694-.925 0-1.76.18-2.505.543a4.675 4.675 0 0 0-1.87 1.57l-3.562-2.294c.825-1.228 1.962-2.183 3.41-2.867 1.45-.705 3.109-1.057 4.98-1.057 1.57 0 2.938.262 4.105.785 1.187.503 2.102 1.227 2.746 2.173.664.925.996 2.022.996 3.29a7.366 7.366 0 0 1-.724 3.229c-.483 1.006-1.419 2.152-2.807 3.44l-4.86 4.588h9.085z' fill='%232F2564'%3e%3c/path%3e%3cpath opacity='.291' fill-rule='evenodd' clip-rule='evenodd' d='M31.611 27.345c9.525 0 16.881 13.864 16.881 4.167 0-9.696-7.721-17.557-17.246-17.557-9.525 0-17.247 7.86-17.247 17.557s8.087-4.167 17.612-4.167z' fill='white'%3e%3c/path%3e%3cpath fill-rule='evenodd' clip-rule='evenodd' d='M11.2 34.755l-3.763 1.813.719-3.84-3.043-2.719 4.205-.56 1.881-3.494 1.881 3.494 4.206.56-3.043 2.72.718 3.84-3.762-1.814zM50.2 34.755l-3.763 1.813.719-3.84-3.043-2.719 4.205-.56 1.881-3.494 1.881 3.494 4.206.56-3.043 2.72.718 3.84-3.762-1.814z' fill='%23F0CE5F'%3e%3c/path%3e%3cdefs%3e%3cfilter id='filter0_d' x='0' y='1.955' width='62' height='64' filterUnits='userSpaceOnUse' color-interpolation-filters='sRGB'%3e%3cfeFlood flood-opacity='0' result='BackgroundImageFix'%3e%3c/feFlood%3e%3cfeColorMatrix in='SourceAlpha' values='0 0 0 0 0 0 0 0 0 0 0 0 0 0 0 0 0 0 127 0'%3e%3c/feColorMatrix%3e%3cfeOffset dy='2'%3e%3c/feOffset%3e%3cfeGaussianBlur stdDeviation='1.5'%3e%3c/feGaussianBlur%3e%3cfeColorMatrix values='0 0 0 0 0 0 0 0 0 0 0 0 0 0 0 0 0 0 0.121745 0'%3e%3c/feColorMatrix%3e%3cfeBlend in2='BackgroundImageFix' result='effect1_dropShadow'%3e%3c/feBlend%3e%3cfeBlend in='SourceGraphic' in2='effect1_dropShadow' result='shape'%3e%3c/feBlend%3e%3c/filter%3e%3cfilter id='filter1_i' x='-1.414' y='-.418' width='63.961' height='65.584' filterUnits='userSpaceOnUse' color-interpolation-filters='sRGB'%3e%3cfeFlood flood-opacity='0' result='BackgroundImageFix'%3e%3c/feFlood%3e%3cfeBlend in='SourceGraphic' in2='BackgroundImageFix' result='shape'%3e%3c/feBlend%3e%3cfeColorMatrix in='SourceAlpha' values='0 0 0 0 0 0 0 0 0 0 0 0 0 0 0 0 0 0 127 0' result='hardAlpha'%3e%3c/feColorMatrix%3e%3cfeOffset dy='1'%3e%3c/feOffset%3e%3cfeGaussianBlur stdDeviation='1'%3e%3c/feGaussianBlur%3e%3cfeComposite in2='hardAlpha' operator='arithmetic' k2='-1' k3='1'%3e%3c/feComposite%3e%3cfeColorMatrix values='0 0 0 0 1 0 0 0 0 1 0 0 0 0 1 0 0 0 1 0'%3e%3c/feColorMatrix%3e%3cfeBlend in2='shape' result='effect1_innerShadow'%3e%3c/feBlend%3e%3c/filter%3e%3c/defs%3e%3c/svg%3e)
'%3e%3c/path%3e%3cpath d='M2 25.407h38a.5.5 0 0 1 .5.5V58a.5.5 0 0 1-.5.5H2a.5.5 0 0 1-.5-.5V25.907a.5.5 0 0 1 .5-.5z' fill='white' stroke='%232F2B64' stroke-width='3'%3e%3c/path%3e%3cpath d='M20.68 42.412h.642c.163 0 .296.133.296.296v9.432a.296.296 0 0 1-.296.296h-.643a.296.296 0 0 1-.296-.296v-9.432c0-.163.133-.296.296-.296z' fill='%232F2564' stroke='%232F2B64' stroke-width='.592'%3e%3c/path%3e%3cpath fill-rule='evenodd' clip-rule='evenodd' d='M18.26 38.462c0-.327.266-.592.592-.592h4.295c.327 0 .592.265.592.592v5.186a.592.592 0 0 1-.592.592h-4.295a.592.592 0 0 1-.591-.592v-5.186z' fill='%232F2564'%3e%3c/path%3e%3c/svg%3e)

FAQs
Got any questions about the iPhone 6 Plus? We’ve got the answers for you