How To iPhone

Tips and Tricks on How to use your iPhone like a Pro


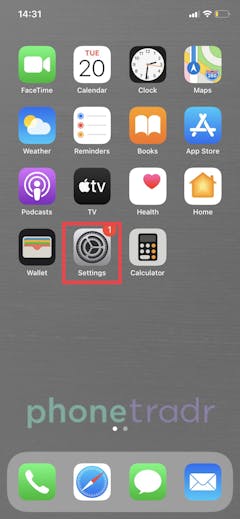
Go to your Settings.

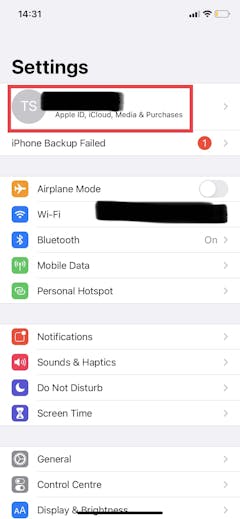
Select Apple ID.

Scroll to the bottom, then select "Sign Out". To clear up definitions, your iCloud login is the same thing as you Apple ID.

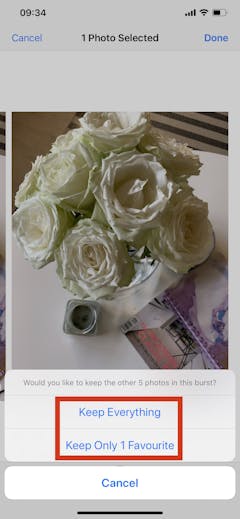
- Open your Camera app

- Hold down the white shutter button with your finger. This will take multiple photos at once, aka a “burst” of photos

- When your finished, you’ll want to choose the best one. Tap “Select”

- Scroll through the burst of photos and tap on your favourite one. Tap “Done” and then “”Keep Only 1 Favourite” or “Keep Everything”
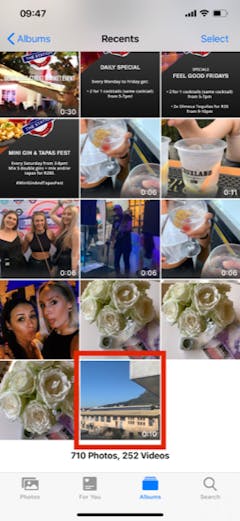
- Open your Camera Roll and find a slo-mo video you’d like to edit
- Tap “Edit”

- Slide, with your finger, the white line underneath the video. The white line determines how much of your video is in slow motion and how much is not. Choose how much of your video you want slowed down or speed up
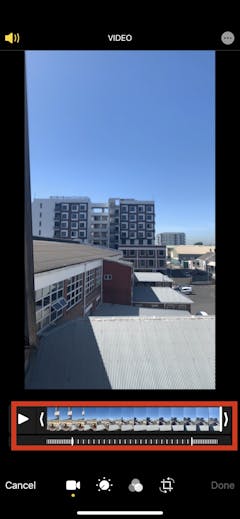
Tap "Done"
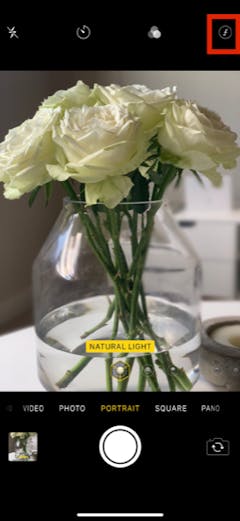
Open your Camera app
Switch from “Photo” to “Portrait”

Tap the aperture feature, which is a small “f” in the top right corner.
Slide left or right to increase or decrease the depth. Sliding to the left will give your photo more depth and sliding to the right gives it less depth.
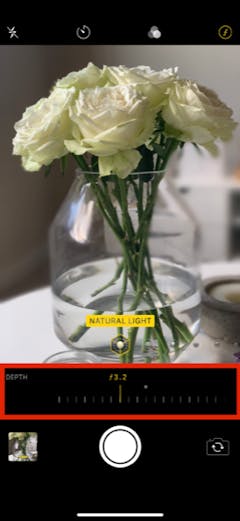
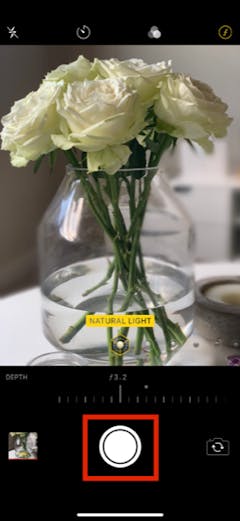
Once you are happy with how much depth you have, tap the shutter button to capture. If you don't get the perfect shot, you can always tap the "Edit" button on your Portrait Mode photo to adjust the depth.
Although Portrait Mode does a lot of the work for you, there are certain things you should remember when trying to get that epic shot!
You’ll have to be at least 2 meters from the subject, otherwise, Portrait Mode won’t activate
If your camera is struggling to find the object/person you’re wanting to focus on, physically tap it on your screen.
Don’t increase the depth-of-field by too much, otherwise, the background will be blurred to the point where you cannot see what it is at all. If it’s something scenic like a mountain or the ocean, you’ll want to keep the depth-of-field low.
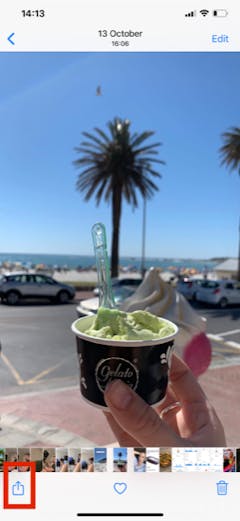
- Open your Photos app

- Select the photo you’d like to make your wallpaper, then tap the "Share" icon at the bottom left
- Scroll and choose the “Use as Wallpaper” option
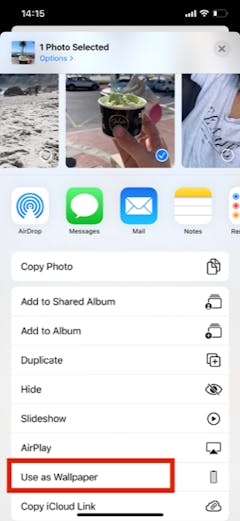
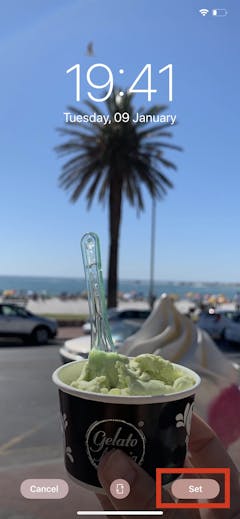
- Pinch to adjust and tap “Set”
Another way you could do it is through your Settings app...
Go to Settings
Open Wallpaper
Then “Choose a New Wallpaper”
Choose one of the premade wallpapers or one of the photos in your Camera roll
Tap “Set” and then choose which screen the wallpaper is for: Your home screen, lock screen or both
- Visit your Settings app
- Tap “Display & Brightness”

- Using the slider, move right to make your display brighter and left to make it more dull

Your iPhone can also determine what your screen’s brightness should be depending on the light around you using its custom ambient light sensor called True Tone. So, if you’d like your screen brightness to decide for you, follow these steps:
-Go to Settings
-Tap Display & Brightness
- Toggle ON True Tone
- Open your Maps app

- Set a driving destination

- Tap “Share”

- Select app you wish to share it on. Then, select the person on your chat list. Your ETA has now been shared with your contact

When you’re ready, you can stop sharing your location. Your friend can now watch you travel in real-time, and will even show when the car has stopped at robots.
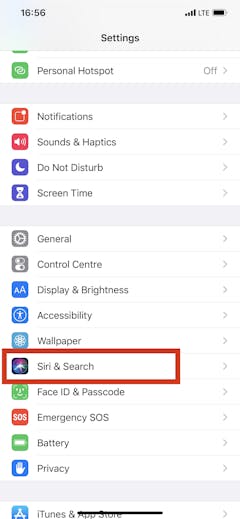
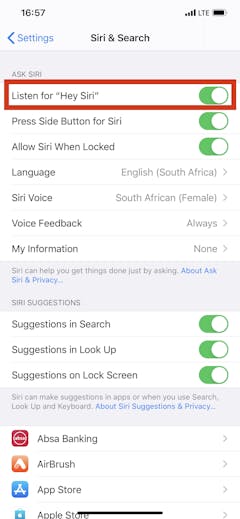
- Launch Settings
- Scroll down and tap “Siri & Search”
- Toggle ON “Listen for ‘Hey Siri’” on. The switch will turn green if you've turned "Hey Siri" on
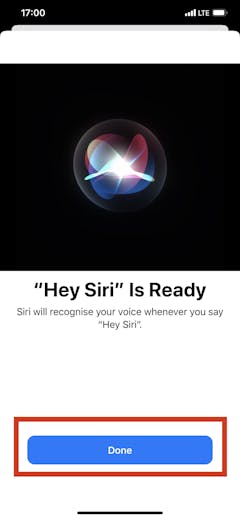
- Tap Continue, then follow the on-screen instructions
- Tap “Done”
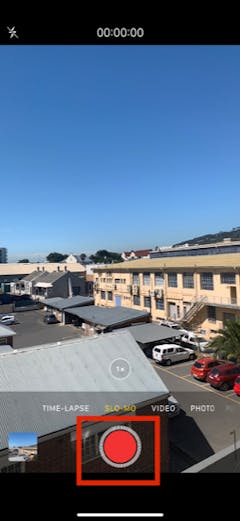
- Open your Camera app
- Slide from “Photo” to “Slo-Mo” and tap the red shutter button when you’re ready to start recording

- Tap the shutter button again when you’re finished recording
Go to your Settings and tap "General".

Choose "Reset".

Select ‘Erase all Content and Settings’.

- Load the video you want to record, press pause or move it to the point that you want to start recording, or just a few seconds prior. If you’re recording a video on YouTube, you’ll want to turn your phone to its side and record in landscape so that you get the most out of the viewing/recording experience.

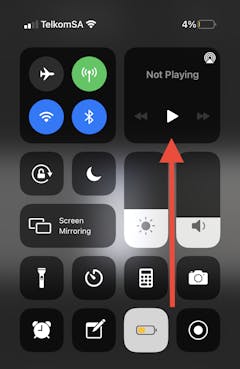
- To start the screen recording, scroll down your Control Centre by swiping DOWN from the top of your screen.
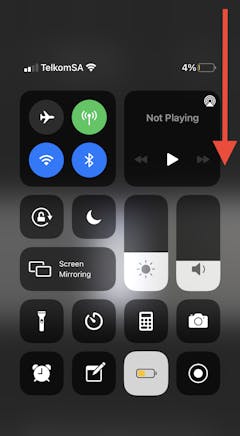
- Tap the screen recording icon, which is a little circle in the middle of the icon.
- Wait for the countdown to finish (3, 2, 1…) and then swipe the Control Centre back up.
- You’re now recording! In a few seconds all the controls will disappear, but to quickly remove them yourself, tap anywhere on the video to remove the controls.
- Once you’re done, swipe the Control Centre back down and tap the icon one more time to end the recording. Then swipe back up.
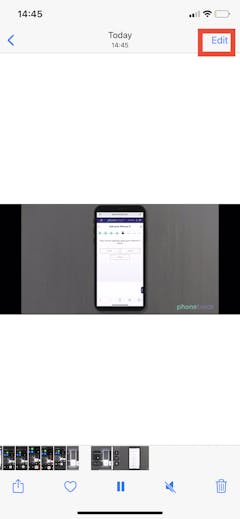
- The recording will automatically save to your camera roll.
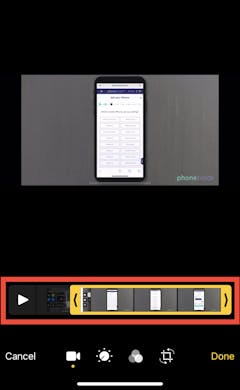
- Once it’s saved, you’ll want to remove the start and end parts that show your Control Centre. Open your camera roll, tap “Edit” at the top right. Then, tap the crop icon at the bottom right.
- Using your finger, slide the yellow line at the start and the end of the video to crop out the first few and last seconds. This will remove the part where you started and ended the screen record.
- Next, you’ll want to crop the video into a square (1:1) or a portrait (3:4) size. Tap the same “Edit” button, then using your finger, manually crop your video into the desired size.
- Tap “Done” and your video is complete!
You might think that doing a screen recording of a video on another platform will result in a pixelated recording, however, the resolution will be in 720p until Apple allows for higher 4K screen recordings.
Go to your Settings.
Tap your Apple ID name at the top.
At the bottom, tap your phone model.

Tap iCloud Backup and Toggle ON.

How to restart your iPhone
Restarting your iPhone is most likely the first port of call when your iPhone is experiencing small glitches like WhatsApp, Facebook, Instagram or any of your apps freezing. For the iPhone X, iPhone 11 and iPhone 12 since it doesn't technically have a home button this is how you would restart your iPhone...
- Press and hold the lock button on the right side of your phone
- At the same time press and hold the top volume button on the left side of your phone for 2-3 seconds until your screen turns black
- On your screen, it’ll say “Swipe to Switch Off”.
- With your finger, swipe and your phone will turn off.
- To turn your phone back on, hold down the lock screen button until the Apple logo appears on your screen. Your phone has been restarted!
If you have the iPhone 6, iPhone 7, iPhone 8, you’ll have a home screen button that you would use to restart your phone. Here’s how you’d do it:
- Hold down the lock screen button, also known as the sleep/wake button, until you see the “Slide to Power Off” slider appear on your screen.
- Let go of the sleep/wake button and swipe on your screen to turn it off.
- To switch it back on, hold the sleep/wake button on the right as well as the home screen button at the bottom. Once the Apple logo appears, the phone has been turned on, and you can let go of the buttons.
Reset all settings: When to use it
It’s best to use the Reset All Settings when you have small glitches and issues, flickering screens or your device freezes. In some cases, restarting your phone can fix some of these issues which we call a soft reset. In case that doesn't work, we can start looking at what's available starting with Reset All Settings.
If you reset all settings, this is everything that will be reset to default:
- All your network settings are removed, including custom carrier settings but these will automatically be reinstated by your carrier (Vodacom MTN or Cell C etc), and of course in the US Verizon, AT & T.
- WiFi will be reset so you need to make a note of your passwords in case you don't have it.
- Bluetooth will reset everything like speakers, Airpods and connections to third-party media like your car.
- You’ll need to re-setup your DND (Do not Disturb) if you had one set up.
- All your notification settings will revert to default as well. For example, if you chose to use banner notifications or if you turned them off altogether, this will all reset.
- If you had any custom privacy settings, it will be reset and you will need to customise your privacy settings again. Privacy settings include Face ID, your pass code, restrictions on apps collecting data on you, restrictions on ads being able to track your online behaviour, passwords on specific apps or games, information stored on your Health app, who has access to your microphone (Whatsapp, Instagram, Skype for example and more all need your permission to use your mic during calls).
- Keyboard dictionary will be reset, so any custom words you added will be removed. Custom words are added automatically when you type something in manually and reject the option given to you by predictive text.
- Apple Pay cards are removed, so if you have added a credit card from ABSA or FNB you will need to add them again.
- Your home screen layout will also reset
- Location settings such as location sharing between apps to friends and family. This will be important if you have location sharing enabled with friends and family as a safety check to always know their location, so this needs to be set up again.
- All your data like photos, videos, contacts, and apps and app content will remain after resetting all settings.
When to use Reset Network Settings
You should use this reset when you’re having specific issues with connection like with WiFi and/or VPN networks that aren’t connecting or carrier issues connecting to data and voice call quality. Bluetooth connections taking a long time to connect would be included too, or your AirPods not connecting or acting up.
How to hard reset your iPhone
Remember, if you’re erasing all content, you’ll also be erasing your phone from Find My iPhone and whatever is in your iCloud account. This is something you should do if you are selling your phone or lending it to a friend.
- Remember, if you’d like to save your data and settings to be used on another iPhone, everything needs to first be backed up to your iCloud account and if you don't have enough space on iCloud and don’t want to pay for extra we recommend using iTunes on a Mac or PC to make a manual back, some of us have amassed 100’s of gigs of photos and video and an offline backup might be better.
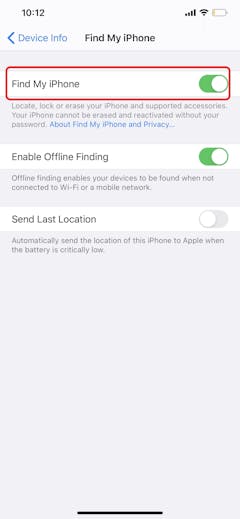
- Also, before performing a hard reset, you need to remove yourself from Find My iPhone. Otherwise, wherever your phone is going (probably to a new owner), it will still have your Find my iPhone activated and they will not be able to add themselves to find my iPhone so..
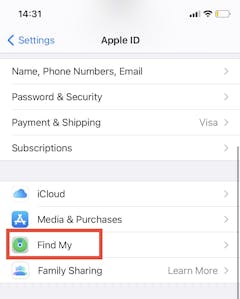
- Go to Settings
Open your Apple ID
Scroll to Find My iPhone
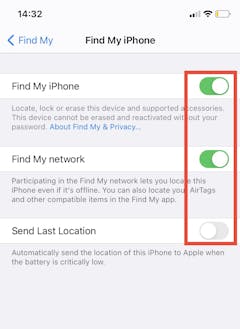
Toggle OFF ‘Find my iPhone’, ‘Find My Network’ and ‘Send Last Location
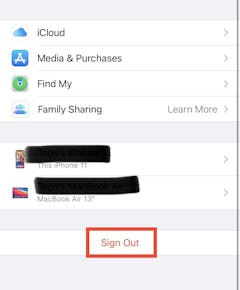
Then you’ll need to sign out of your Apple ID altogether. Tap Apple ID, scroll to the bottom, and tap ‘Sign Out’
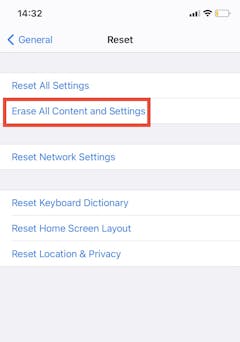
Now you can go back to your Settings and tap ‘General’
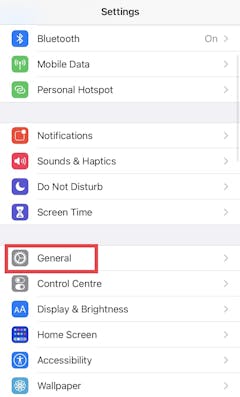
Choose ‘Reset’
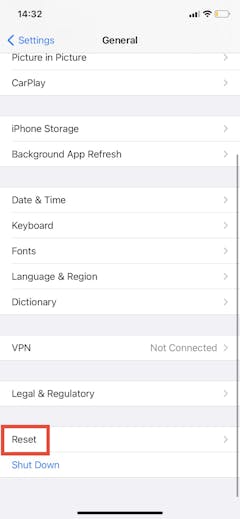
Select ‘Erase all Content and Settings’
Go into your Settings.
Tap your Apple ID name at the top.
Tap your phone model at the bottom.
Tap "Find My iPhone" and toggle off.
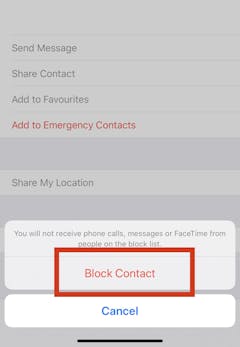
- Open your list of contacts, scroll to the name of the person you’d like to block
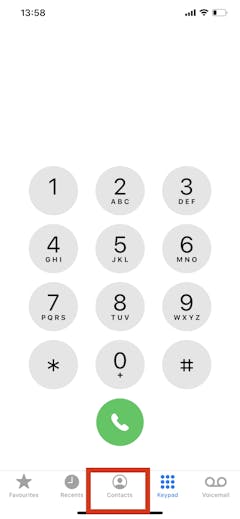
- Tap the name then tap “Block this Caller”
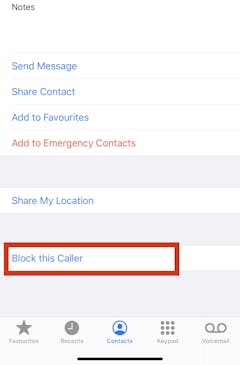
- You will be asked again if you’d like to block this caller. Tap it again
If you change your mind, or have maybe blocked the wrong number, simply follow these steps:
- Open your phone app, go to your list of contacts, and go to the contact that needs to be unblocked
- Tap the name of the contact and then tap “Unblock this Caller”
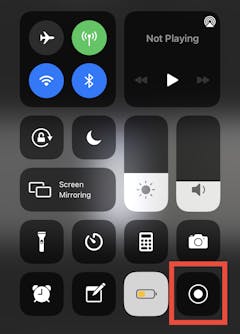
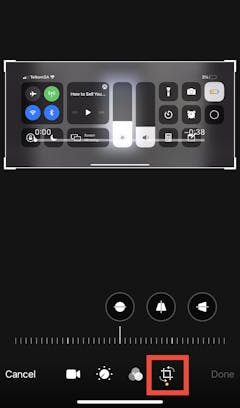
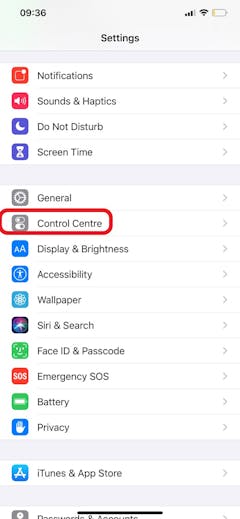
Go to your Settings, then select the Control Centre.
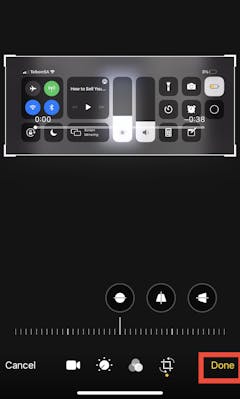
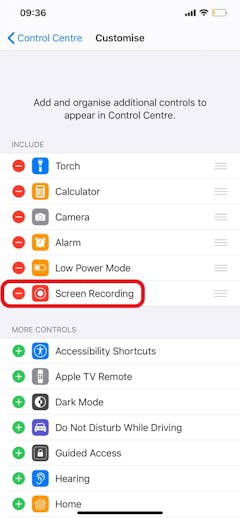
Tap into "Customise Controls" then add "Screen Recording" to the list.
Exit your settings and then head to your homescreen. Swipe up the Control Centre and select the little white circle in the square icon. This is the Screen Recording icon.

The recorder will count down from 3 and then whatever actions you take on your iPhone will be recorded.
Once you’re done, tap the red recording timer at the top of your screen to stop the recording. You can find your recording in your camera roll and edit it just like a standard video such as trimming the start and end of it. Or, you can edit it in iMovie which comes free with your iPhone.
Not many people know that you can crop videos using your iPhone’s video editing tools to make it a square or rectangle.
- Simply open your Camera roll
- Select the video
- Tap “Edit”
- Select the crop tool on the far right
- With your index finger, drag the white line at the top and the bottom to where you’d like the video to be cropped.


- Launch the Settings app on your iPhone or iPad
- Tap “Screen Time”, then tap “Downtime”

- Toggle ON Downtime to enable it

- Select a start and end time using the drop-down hour and minute wheels.


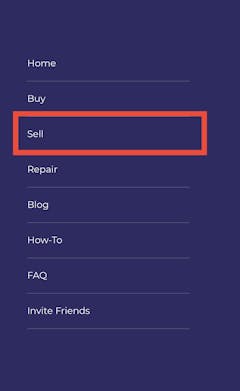
Go to https://www.phonetradr.com/. You’ll see a “Buy” and “Sell” tab at the top of your screen. Select “Sell”.
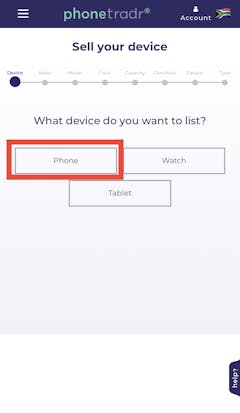
Select which kind of device you're selling. In this case, it's "Phone".
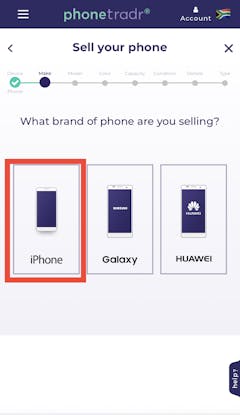
Select which brand of smartphone you have. We offer owners of iPhone, Samsung and Huawei phones to sell their devices.
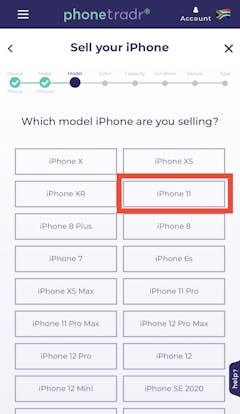
Select the model of your smartphone. Is your device an iPhone X, 11, 12 Pro or something else?
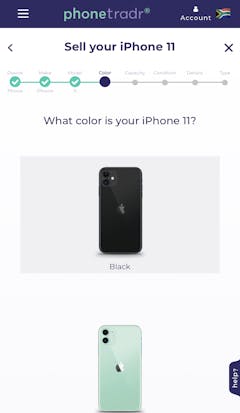
Select the colour of your smartphone.
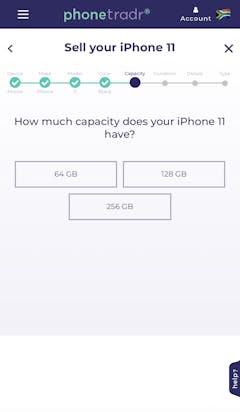
Choose the capacity of your device, for example, 128 GB. To find out what your capacity is, go into your Settings > General > iPhone Storage.
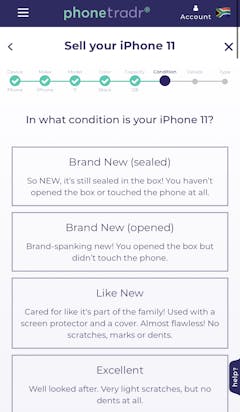
Choose the condition of your device, for example, “Excellent” or “Damaged”. We have created various condition options based on how your iPhone looks and operates. It’s important to be as honest as you can so that we don’t shortchange the buyer.
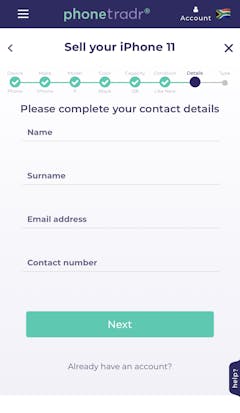
Fill in your contact details so that we can keep you posted on the progress of the sale.
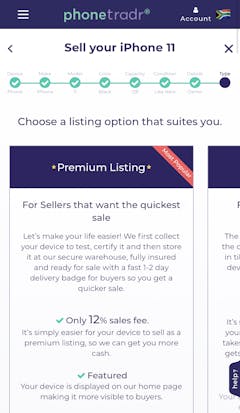
Select either the Instant Listing or the Premium Listing option.
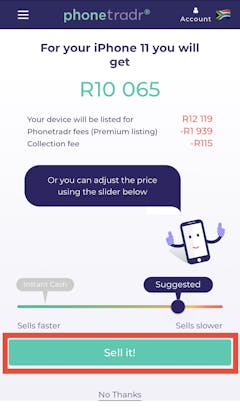
Now we will give you a suggested sale price that you can change whenever you want. Simply drag the price slider to the right to sell at a higher price or to the left to sell for a smaller amount. Then, click "Sell it!"
It’s that easy! You’ll get an email from us, shortly after, confirming your listing and we promise to keep you updated on your listing until the money is in your bank account.
- Open you Photos app.There’s no need to upload your pic to any photo editing apps, as all the tools you need are on your phone!
- Tap the photo you want to edit, then tap “Edit” on the top right corner

At the bottom, you will see editing icons including exposure, brightness, warmth and more. Each term means something in the world of photography. We’re going to break it down for you below.

- Tap “Done” when you are finished editing

Warmth: This tool uplifts colours toward a more Summery look and feel, with more orange, yellow, blue and green tones being highlighted.
Brightness: This tool lifts the brightness of the photo overall
Highlights: Different to brightness, this tool brightens the already lighter parts of the photo and darkens the more shadowy parts of the photo simultaneously.
Brilliance: This feature combines clearing up detail like texture and lifts brightness.
Saturation: Unique to warmth, saturation can lift the colour as well as dull it depending on if you slide it up or down.
Vibrance: This feature boosts colour intensity.
Sharpness: The sharpness tool adds a little more professionalism to your photos. It adds more definition to facial features, hair strands, texture like leaves on a tree.
Noise Reduction: If you took a photo in low light, smartphone photos often have a bit of fuzziness to it. This tool reduces that problem.
Shadows: This tool adds more mood to the photo by darkening the shadows in the photo.
- Go to your Settings
- Tap “Display and Brightness”
- Tap "Dark Mode”

- Toggle ON “Automatic” so that Dark Mode comes up automatically when the sun sets

- If you’re enjoying the look of Dark Mode, you can also set it permanently by selecting the dark interface.
- When temporarily deactivating your account, you can’t do it via the app on your phone. You’ll have to log into your Instagram account via a web browser like Safari or Chrome: https://www.instagram.com
- Once you’re in, click your Settings icon at the top left-hand corner.

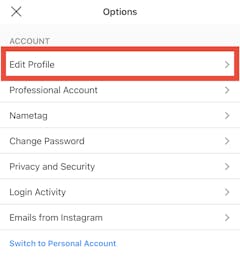
- Select “Settings”, then Edit Profile”.
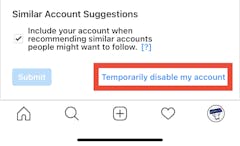
- Scroll down to the very bottom and click “Temporarily disable my account”
- Your account is now invisible to other users and will only reactivate once you log back in again.
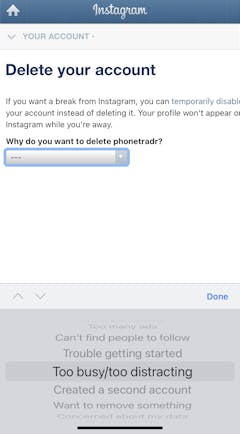
Instagram hasn’t exactly made it easy to delete your account. Firstly, you can’t permanently delete your Instagram account from the app on your phone. You’ll need to visit the exact “Delete Your Account” page created by Instagram on a web browser. Here’s the page:https://www.instagram.com/accounts/remove/request/permanent/
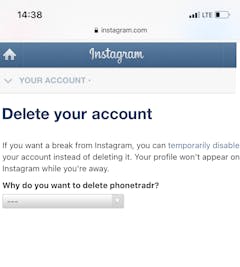
- Fill out the reason from a drop-down list provided.
- Enter your password once more so that they can verify that it’s you.
- Then click “Permanently delete my account”
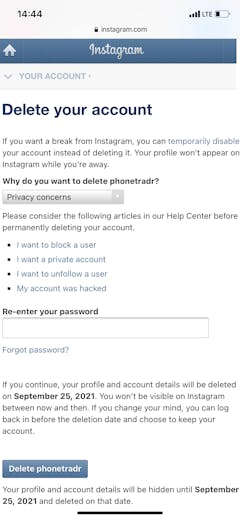
- And done! You’ll notice in the fine print at the bottom that it will give you a month to change your mind before your account is permanently deleted. After that, you’re officially off of Instagram for good.
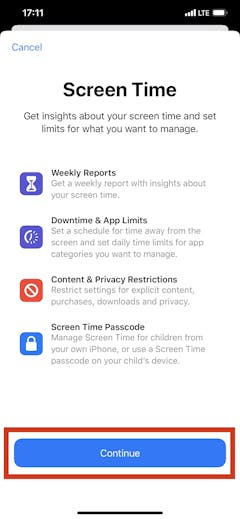
- Go to your Settings app
- Select” Screen Time”
- Tap “Turn on ScreenTime”

- You will be displayed the four features of Screen Time with short explanations. Tap “Continue”
- You will be asked if this iPhone is for you or your child. This will determine your limitations. Tap the correct option
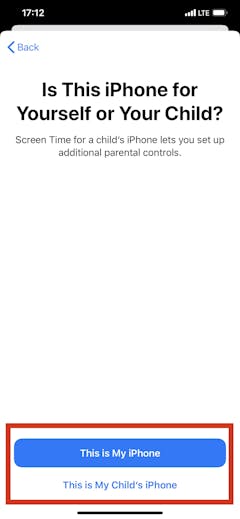
- Screen Time is now active. You will receive a daily report with stats on how much time you spend on your apps